
Basic Microsoft Word interview questions
1. What is Microsoft Word, in simple terms?
2. Can you explain what the 'ribbon' is at the top of the Word screen?
3. What is the difference between 'Save' and 'Save As'?
4. How would you make a word bold, italicized, or underlined?
5. What does 'copy-pasting' mean, and how do you do it in Word?
6. How do you change the size of the letters (font size)?
7. What is a 'font,' and can you name a few different fonts?
8. How do you make a list with bullet points?
9. What is 'spell check,' and how do you use it?
10. How do you insert a picture into a Word document?
11. What is a header and footer and where do you find it?
12. How do you change the margins of a document?
13. What is line spacing, and why might you change it?
14. Explain how to create a table in Word.
15. How would you undo something you just did?
16. How can you find a specific word in a long document?
17. What is the purpose of using different heading styles (Heading 1, Heading 2, etc.)?
18. How do you print a document?
19. What is 'cut' and 'paste' and How is it different from 'copy' and 'paste'?
20. Can you show me how to change the color of the text?
21. How do you add page numbers to a document?
22. What is a template in Word, and how would you use one?
23. How can you make the words on the page line up differently (left, center, right)?
24. What is 'word wrap'?
25. How would you insert a symbol into your document, like a copyright symbol?
26. What is the difference between portrait and landscape orientation?
27. If you accidentally deleted a large section of text, what would you do?
28. Explain what a hyperlink is.
29. Where would you go to change the language settings in Word?
30. How can you quickly select an entire paragraph?
Intermediate Microsoft Word interview questions
1. Explain how you would use mail merge to create personalized letters for a large group of recipients.
2. Describe a situation where you would use section breaks in a Word document and why.
3. How do you insert and manage footnotes and endnotes in a Word document?
4. What are styles in Word, and how can they improve the formatting consistency of a document?
5. Explain how to create and use a table of contents in Word.
6. Describe the steps you would take to protect a Word document with a password.
7. How do you track changes in a Word document, and how do you accept or reject those changes?
8. What are macros in Word, and how can they be used to automate repetitive tasks?
9. Explain how to insert and format images in a Word document, including wrapping text around them.
10. How can you ensure accessibility of a Word document for people with disabilities?
11. Describe how to create and modify headers and footers in Word.
12. How do you work with columns in Word, and what are some use cases for using columns?
13. Explain how to use the Find and Replace feature in Word, including advanced search options.
14. Describe how to create and use templates in Word.
15. How do you insert special characters and symbols in Word?
16. Explain how to use cross-references in a Word document.
17. How do you embed fonts in a Word document?
18. Describe the difference between relative and absolute hyperlinks in Word.
19. Explain how to use bookmarks in Word and why they are useful.
20. How would you convert a Word document into a PDF, ensuring that all formatting is preserved?
21. Walk me through the process of creating a multi-level list in Word and explain its formatting options.
Advanced Microsoft Word interview questions
1. Explain how you would use macros to automate a repetitive task in Microsoft Word, providing a specific example.
2. Describe a situation where you would use mail merge and outline the steps involved in setting it up.
3. How would you create a fillable form in Microsoft Word, and what are some considerations for making it user-friendly?
4. Explain the difference between bookmarks and cross-references in Word and how you would use them in a long document.
5. Describe how you would protect a Word document from unwanted changes, and what are the different levels of protection available?
6. How would you create a table of authorities in a legal document using Microsoft Word?
7. Explain how to use the 'Track Changes' feature effectively in a collaborative writing environment.
8. Describe the steps you would take to embed a font in a Word document and why you might want to do so.
9. How can you ensure accessibility in a Word document for users with disabilities?
10. Explain how you would use the Styles pane to create a consistent look and feel across a large document.
11. Describe how you would manage different versions of a Word document and revert to an older version if needed.
12. How do you insert and manage citations and bibliographies in Microsoft Word using a citation management tool (like EndNote or Zotero)?
13. Explain how to create and customize headers and footers in a Word document, including different headers/footers for different sections.
14. Describe how you would use the 'Outline View' in Word to organize and navigate a complex document.
15. How would you troubleshoot a corrupted Word document and attempt to recover its contents?
16. Explain how to create and use templates in Microsoft Word to standardize document creation.
17. Describe how you would use the 'Compare' feature in Word to identify differences between two versions of a document.
18. How do you embed different types of objects (e.g., Excel charts, videos) into a Word document, and what are the advantages/disadvantages of each method?
19. Explain how to use advanced find and replace options, such as wildcards and regular expressions, in Word.
20. Describe how to create a master document and subdocuments in Word for managing large, multi-part projects.
21. How would you use VBA (Visual Basic for Applications) to create a custom function or automation in Microsoft Word?
22. Explain how to create custom keyboard shortcuts in Word to improve your efficiency.
23. Describe how you would prepare a Word document for professional printing, including considerations for margins, bleed, and color management.
Expert Microsoft Word interview questions
1. Explain the differences between using bookmarks and hyperlinks in a Word document, especially in the context of large documents with cross-references.
2. Describe a scenario where you would use a macro in Word to automate a complex or repetitive task. Provide specific examples of the macro's functionality.
3. How would you troubleshoot a Word document that is consistently crashing or freezing when working with large images or embedded objects?
4. Explain how to use the 'XML Mapping Pane' in Word to create structured documents that can be easily exported and imported into databases or other applications.
5. Describe the process of creating and managing a table of authorities in Word, including citation formatting and updating the table automatically.
6. Explain how you would use Word's 'Mail Merge' feature to personalize and send out a large batch of emails, including handling conditional content based on recipient data.
7. How would you create a custom style set in Word that ensures consistent formatting across multiple documents, and how would you share this style set with other users?
8. Describe the steps involved in using Word's 'Compare Documents' feature to identify and merge changes between two versions of a document, including resolving conflicts.
9. Explain how to use Word's 'Document Inspector' to remove hidden metadata and personal information from a document before sharing it externally.
10. How would you embed a custom font in a Word document to ensure that it displays correctly on other computers, even if the font is not installed?
11. Describe the process of creating and using a master document with subdocuments in Word, including managing cross-references and updating the table of contents.
12. Explain how to use Word's 'Track Changes' feature effectively in a collaborative editing environment, including accepting or rejecting changes and adding comments.
13. How would you create a fillable form in Word that can be easily completed by users, including adding form fields and protecting the document from unauthorized changes?
14. Explain the differences between using the 'Insert Picture' command and the 'Insert Online Pictures' command in Word, especially in terms of file size and image quality.
15. Describe how to use Word's 'Equation Editor' to create complex mathematical equations and symbols, including formatting and alignment options.
16. Explain how you would integrate Word with other Microsoft Office applications, such as Excel or PowerPoint, to create dynamic documents or presentations.
17. How can you ensure accessibility compliance in a Word document for users with disabilities, including adding alt text to images and using appropriate heading styles?
18. Describe a situation where you had to recover a corrupted Word document, and explain the steps you took to restore it to its original state.
19. Explain how to create and use custom keyboard shortcuts in Word to speed up common tasks, such as formatting or inserting symbols.
20. How would you manage version control in Word without relying on external software like SharePoint, especially when multiple people are collaborating on the same document?
21. Describe the process of creating and using a custom watermark in Word, including adding text or images and controlling its transparency and position.
22. Explain how to troubleshoot printing issues in Word, such as incorrect margins, missing content, or unexpected formatting changes.
23. How would you use Word's 'Thesaurus' and 'Grammar Checker' features to improve the clarity and accuracy of your writing?

Microsoft Word remains a application for document creation and processing, particularly in professional environments. Therefore, assessing a candidate's is as the ability to effectively utilize it during interviews is important.
This blog post provides a series of Microsoft Word interview questions categorized by skill level, from basic to expert. It also includes a section of multiple-choice questions (MCQs) to further evaluate candidates.
By using these questions, recruiters can evaluate candidates, ensuring they possess the skills. Before conducting interviews, consider using Adaface's English proficiency tests to to filter candidates.
Table of contents
Basic Microsoft Word interview questions
Intermediate Microsoft Word interview questions
Advanced Microsoft Word interview questions
Expert Microsoft Word interview questions
Microsoft Word MCQ
Which Microsoft Word skills should you evaluate during the interview phase?
Hire Top Microsoft Word Experts with Skills Tests
Download Microsoft Word interview questions template in multiple formats
Basic Microsoft Word interview questions
1. What is Microsoft Word, in simple terms?
Microsoft Word is a software application primarily used for creating, editing, and formatting text-based documents. Think of it as a digital typewriter with superpowers. It allows users to produce various types of documents such as letters, reports, resumes, and books.
It offers tools to customize the appearance of text, add images, create tables, and check spelling and grammar. Word is a widely used tool for both personal and professional writing needs.
2. Can you explain what the 'ribbon' is at the top of the Word screen?
The 'ribbon' in Microsoft Word (and other Office applications) is the graphical control element located below the Quick Access Toolbar and the title bar. It replaced the traditional menu bar and toolbars found in older versions. The ribbon is designed to help users quickly find the commands needed to complete a task.
The ribbon is organized into tabs (like 'File', 'Home', 'Insert', 'Layout', etc.), and each tab contains groups of related commands. For example, the 'Home' tab typically includes groups for 'Clipboard', 'Font', 'Paragraph', and 'Styles'. Commands are usually represented by icons and text labels, making them visually accessible and easier to understand compared to text-based menus.
3. What is the difference between 'Save' and 'Save As'?
The 'Save' command typically overwrites the existing file with the current changes, maintaining the same filename and location. If the file hasn't been saved before, 'Save' will behave like 'Save As'.
'Save As', on the other hand, allows you to create a new file, change the file name, choose a different file format, or save the file to a different location. It always prompts you to specify these details before saving.
4. How would you make a word bold, italicized, or underlined?
To make a word bold, use double asterisks **like this** or double underscores __like this__. To italicize a word, use single asterisks *like this* or single underscores _like this_. To underline text, which is not standard Markdown, you can use HTML: <ins>like this</ins>. Note that some Markdown editors/renderers might not support HTML tags.
Here's a summary:
- Bold:
**text**or__text__ - Italic:
*text*or_text_ - Underline:
<ins>text</ins>
5. What does 'copy-pasting' mean, and how do you do it in Word?
Copy-pasting refers to the action of duplicating data (text, images, etc.) from one location and inserting it into another. In Microsoft Word, you can copy-paste using several methods.
To copy, you can select the desired content and then either:
- Press
Ctrl+C(Windows) orCmd+C(Mac). - Right-click the selection and choose "Copy".
- Use the "Copy" button in the "Home" tab of the ribbon.
To paste, go to the desired location and then either:
- Press
Ctrl+V(Windows) orCmd+V(Mac). - Right-click and choose a paste option (e.g., "Keep Source Formatting", "Merge Formatting", "Keep Text Only").
- Use the "Paste" button in the "Home" tab of the ribbon. Note that the paste button has a drop-down menu offering the paste options.
6. How do you change the size of the letters (font size)?
The method for changing the size of letters (font size) depends on the context. In a word processor or text editor, you typically use the font size dropdown menu or a corresponding command (e.g., in Microsoft Word, you select the text and choose a size from the font size dropdown).
In HTML/CSS, you can use the font-size CSS property. For example, font-size: 16px; sets the font size to 16 pixels. Other units like em, rem, or percentages can also be used to define the font size. You can apply this property inline using the style attribute or define it in a CSS stylesheet.
7. What is a 'font,' and can you name a few different fonts?
A font is a specific typeface design, encompassing a complete set of characters (letters, numbers, symbols) in a particular size and style. It dictates the visual appearance of text.
Some common fonts include: Arial, Times New Roman, Courier New, Helvetica, and Verdana. These are all sans-serif or serif fonts, depending on whether they have small decorative strokes at the end of the letters.
8. How do you make a list with bullet points?
To create a bulleted list in Markdown, you can use either an asterisk (*), a plus sign (+), or a hyphen (-) followed by a space before each item in the list. For example:
* Item 1
* Item 2
* Item 3
This will render as:
- Item 1
- Item 2
- Item 3
You can also create sub-lists (nested lists) by indenting the sub-list items with spaces (usually two or four spaces) or a tab character. Consistent indentation is important.
9. What is 'spell check,' and how do you use it?
Spell check is a feature in software applications that identifies and suggests corrections for misspelled words in a document. It works by comparing each word in the text against a dictionary of correctly spelled words. If a word is not found in the dictionary, it's flagged as a potential misspelling.
I use spell check by enabling it in applications like word processors, email clients, and web browsers. When writing, misspelled words are typically underlined in red, allowing me to right-click the word and choose from a list of suggested corrections or manually correct the spelling. Some tools also have an "ignore" or "add to dictionary" option.
10. How do you insert a picture into a Word document?
To insert a picture into a Word document, go to the 'Insert' tab on the ribbon. In the 'Illustrations' group, you'll see options like 'Pictures' and 'Online Pictures'. Choose 'Pictures' to insert an image from your computer. A file explorer window will open, allowing you to navigate to the location of the picture you want to insert and select it. Click 'Insert' to add the picture to your document.
Alternatively, choose 'Online Pictures' to search for and insert images from online sources like Bing Image Search. You can search for specific images and then select one to insert. Once the picture is inserted, you can resize, move, and format it using the picture formatting tools that appear when the image is selected.
11. What is a header and footer and where do you find it?
Headers and footers are sections of a document (like a Word document, web page, or PDF) that appear in the top (header) and bottom (footer) margins, respectively. They typically contain information such as page numbers, document titles, dates, author names, or company logos. You'll find them in most document creation or viewing applications (e.g., Microsoft Word, Google Docs, web browsers, PDF viewers). In web development, headers and footers are defined in HTML, often within the <footer> and <header> tags or potentially in a master page layout in frameworks.
12. How do you change the margins of a document?
The method for changing document margins depends on the software being used. In word processors like Microsoft Word or Google Docs, margins are typically adjusted through the "Page Layout" or "File > Page Setup" menus. You can specify the top, bottom, left, and right margins in inches or centimeters.
For web documents (HTML/CSS), margins are controlled using CSS properties. Specifically, you can use the margin-top, margin-bottom, margin-left, and margin-right properties or the shorthand margin property to define the spacing around an element. For example, margin: 10px 20px; sets 10px top and bottom margins and 20px left and right margins.
13. What is line spacing, and why might you change it?
Line spacing, also known as leading, refers to the vertical distance between lines of text. It affects the readability and visual appeal of a document. Changing line spacing alters the amount of white space between lines.
Reasons to modify line spacing include improving readability (making text less cramped or more open), adjusting the document's length to fit a specific page count, or adhering to style guidelines (e.g., double-spacing for academic papers).
14. Explain how to create a table in Word.
To create a table in Microsoft Word, you can use the "Insert" tab. Click on the "Table" option. You'll see a grid allowing you to select the number of rows and columns you want. Hover your mouse over the grid to highlight the desired table size, and then click to insert the table. Alternatively, you can choose "Insert Table..." to manually specify the number of rows and columns or use pre-designed quick tables.
Another option is to draw the table manually. Select "Draw Table" from the Table dropdown, and then use your mouse to draw the outline of the table and then draw the individual cells within it. You can also convert existing text into a table by selecting the text and then selecting "Convert Text to Table" from the "Table" menu.
15. How would you undo something you just did?
The specific method for undoing an action depends heavily on the context. In many applications, Ctrl+Z (or Cmd+Z on macOS) is the standard shortcut for undoing the last action. Most programs have an 'Edit' menu that includes an 'Undo' option.
In a programming or terminal environment, git revert <commit_hash> can be used to undo a commit and create a new one that reverses the changes. In some editors, plugins or built-in features may be available to undo specific types of changes. For database operations, an appropriate rollback mechanism should be in place, often through transaction management.
16. How can you find a specific word in a long document?
To find a specific word in a long document, you can use several approaches. A simple method involves using the built-in find functionality of most text editors or word processors (usually accessed with Ctrl+F or Cmd+F). You can also use command-line tools like grep on Linux/macOS or findstr on Windows for more advanced searching, including regular expressions.
For programmatic solutions, in Python for example, you can read the document into a string and then use the string.find() or the re.search() (if more complex pattern matching is needed) functions. Regular expressions can be very powerful for finding variations of the word or specific patterns.
17. What is the purpose of using different heading styles (Heading 1, Heading 2, etc.)?
Different heading styles (Heading 1, Heading 2, etc.) are used primarily for structuring and organizing content. They create a hierarchical outline of the document, making it easier for both humans and machines to understand the document's organization and key topics. This improves readability and navigation.
Using headings also has SEO benefits. Search engines use headings to understand the content and rank pages accordingly. Additionally, headings are commonly used to generate a table of contents, providing readers with a quick overview of the document's structure and allowing them to jump directly to specific sections.
18. How do you print a document?
Printing a document depends on the context (operating system, application). Generally, you would:
- Open the document in its respective application (e.g., Word, PDF viewer, web browser).
- Go to
File -> Printor use a shortcut likeCtrl+P(Windows) orCmd+P(macOS). - A print dialog box will appear where you can select:
- Printer: Choose the target printer.
- Copies: Specify the number of copies.
- Page Range: Select specific pages or print all.
- Other settings: Paper size, orientation, color/grayscale, etc.
- Click "Print" to send the document to the printer.
19. What is 'cut' and 'paste' and How is it different from 'copy' and 'paste'?
Cut and paste, and copy and paste are both fundamental operations for moving and duplicating data. 'Cut' removes the original data from its current location and stores it temporarily (usually in the clipboard). 'Paste' then inserts the data from the clipboard into a new location.
The key difference is that 'copy' leaves the original data intact in its original location, while 'cut' removes it. So, 'copy and paste' duplicates data, and 'cut and paste' moves data. For example, if you cut a paragraph of text, it disappears from where it was. If you copy it, the original paragraph remains.
20. Can you show me how to change the color of the text?
Markdown itself doesn't natively support direct text color manipulation. It's a lightweight markup language focused on structure and formatting. To change text color, you generally need to use HTML within your markdown or apply CSS styles.
For example, you could use inline HTML like this: <span style="color:blue;">This text is blue.</span> Alternatively, if you're rendering your markdown in a web environment, you could apply styles to elements based on CSS selectors or even use a CSS class. If you are using a specific markdown editor or platform, it might have some extentions to change the color, look up the documentation for that editor.
21. How do you add page numbers to a document?
Adding page numbers depends on the software you're using. In Microsoft Word, go to the 'Insert' tab and select 'Page Number'. You can choose the position (top, bottom, margins, etc.) and style. Other word processors like Google Docs have similar options under the 'Insert' menu.
For PDFs, applications like Adobe Acrobat allow you to add page numbers using the 'Edit PDF' tool and then selecting 'Header & Footer' -> 'Add'. You can customize the location, font, and formatting of the page numbers.
22. What is a template in Word, and how would you use one?
A template in Microsoft Word is a pre-designed document that provides a basic structure and formatting for creating new documents. It includes elements like headings, fonts, margins, and styles, allowing you to quickly create professional-looking documents without starting from scratch.
To use a template, you can either open Word and choose from the available templates (e.g., resume, report, letter), or you can download a template from online sources. Once you open a template, you can then customize it by replacing the placeholder text with your own content, adjusting the formatting as needed, and saving the document as a new file.
23. How can you make the words on the page line up differently (left, center, right)?
You can control text alignment using CSS. The text-align property is used for this purpose. Here's how you'd use it for left, center, and right alignment:
text-align: left;Aligns the text to the left (this is the default).text-align: center;Centers the text horizontally.text-align: right;Aligns the text to the right.
24. What is 'word wrap'?
Word wrap is a feature in text editors, word processors, and other applications that automatically moves words to the next line when they reach the end of the current line. This prevents text from extending beyond the visible boundaries of the display area.
Instead of requiring the user to manually press 'Enter' or 'Return' to start a new line, word wrap handles line breaks automatically. This makes text easier to read and edit, especially within confined spaces or when the window size is changed.
25. How would you insert a symbol into your document, like a copyright symbol?
To insert a copyright symbol in a document, you can use several methods:
- Character Map/Emoji Picker: Most operating systems have a character map or emoji picker where you can search for and copy the copyright symbol (©) and paste it into your document.
- HTML Entity: In HTML, use the entity
©to render the copyright symbol. - Unicode: You can directly use the Unicode character for copyright which is
U+00A9. In many applications, you can enter the code point directly, sometimes by holding down theAltkey and typing0169on the numeric keypad (Windows). In other systems,Ctrl+Shift+ufollowed bya9and thenEntermay work.
26. What is the difference between portrait and landscape orientation?
Portrait and landscape orientations refer to the way a rectangular page or screen is oriented.
Portrait orientation is taller than it is wide, like a typical portrait painting or a standard sheet of paper held upright. Landscape orientation is wider than it is tall, like a landscape painting or a movie screen. Think of how you hold your phone to take a photo; vertical is portrait, horizontal is landscape.
27. If you accidentally deleted a large section of text, what would you do?
My immediate action would depend on the application I'm using. Most text editors and IDEs have an "Undo" function (usually Ctrl+Z or Cmd+Z) which would be my first attempt to recover the deleted text. If that doesn't work or I've performed too many actions since the deletion, I would check if the application autosaves or creates backups. Many programs create temporary files or versions that might contain the lost text. For example, many editors will save previous versions of the file locally. I will look for those versions. If it's code under version control (like Git), I'd revert to the last commit or examine the history to retrieve the deleted section. Finally, if all else fails, I would rewrite the text from scratch, referencing any available documentation or memory of what was written.
28. Explain what a hyperlink is.
A hyperlink is an element in an electronic document that links to another place in the same document or to an entirely different document. It allows users to navigate seamlessly between different parts of a website or different websites altogether, or other resources.
Hyperlinks can be text, images, or other HTML elements. When a user clicks or taps on a hyperlink, their web browser navigates to the linked resource. The destination can be another web page, a specific section within a page, a file to download, an email address, or another online resource.
29. Where would you go to change the language settings in Word?
In Microsoft Word, you can change the language settings by navigating to File > Options > Language. This section allows you to set the Office display language, proofing language, and keyboard layout.
Alternatively, you can usually change the proofing language (used for spell check and grammar check) for a specific document or section of text by selecting the text, then going to the Review tab and clicking on Language > Set Proofing Language.
30. How can you quickly select an entire paragraph?
To quickly select an entire paragraph in most text editors and word processors, you can triple-click anywhere within the paragraph.
Alternatively, you can position your cursor at the very beginning of the paragraph, hold down the Shift key, and then click at the very end of the paragraph. This will select everything between the two points, effectively selecting the entire paragraph. However, the triple-click method is typically faster and more convenient.
Intermediate Microsoft Word interview questions
1. Explain how you would use mail merge to create personalized letters for a large group of recipients.
Mail merge automates creating personalized letters for many recipients. I'd start by creating a template letter in a word processor like Microsoft Word or Google Docs. This template would contain placeholders, also known as merge fields, for information like the recipient's name, address, and other custom details. Next, I'd prepare a data source, such as a spreadsheet or database, containing all the recipient information, with each column corresponding to a merge field in the template.
To perform the mail merge, I'd connect the template to the data source. The mail merge feature in the word processor iterates through each row in the data source, replacing the merge fields in the template with the corresponding data for each recipient. Finally, I'd generate the personalized letters. The results can be created as individual documents, merged into a single document, or sent directly as emails, depending on the mail merge software features and desired outcome.
2. Describe a situation where you would use section breaks in a Word document and why.
I would use section breaks in a Word document when I need to apply different formatting to specific parts of the document. For example, if I want to have a different number of columns on a particular page or apply a different header/footer to just one section, section breaks allow me to isolate those changes.
Specifically, I might use a "Next Page" section break to start a new chapter on a new page, ensuring that the chapter always begins at the top of a fresh page. Or, I might use a "Continuous" section break to change the column layout within the same page, like when creating a newsletter layout where the introductory paragraph is single-column, followed by a multi-column layout for the rest of the content.
3. How do you insert and manage footnotes and endnotes in a Word document?
In Microsoft Word, footnotes and endnotes are used to add supplementary information to a document. To insert a footnote, go to the 'References' tab and click 'Insert Footnote'. Word will automatically insert a superscript number at the cursor position and create a corresponding footnote at the bottom of the page. Similarly, to insert an endnote, click 'Insert Endnote' in the 'References' tab; this will place the endnote at the end of the section or document, depending on the settings. You can manage footnotes and endnotes through the 'Footnote & Endnote' dialog box (accessed via the small arrow in the bottom-right corner of the 'Footnotes' group in the 'References' tab). This dialog allows you to customize the numbering format, location, and other options for both footnotes and endnotes. You can also convert footnotes to endnotes and vice-versa using this dialog. To navigate between footnotes and endnotes, use the 'Next Footnote' or 'Previous Footnote' buttons in the 'References' tab.
4. What are styles in Word, and how can they improve the formatting consistency of a document?
Styles in Word are pre-defined sets of formatting characteristics, such as font, size, color, paragraph spacing, and indentation, that can be applied to text. Instead of manually formatting each element, you can apply a style with a single click, ensuring consistent formatting throughout your document. This simplifies formatting and reduces the risk of errors.
Styles significantly improve formatting consistency by allowing you to quickly apply the same formatting to multiple sections. If you need to change the formatting, you only need to modify the style definition, and all instances of that style will automatically update, saving time and effort compared to individually changing each instance. This ensures a professional and uniform appearance across the document.
5. Explain how to create and use a table of contents in Word.
To create a table of contents (TOC) in Microsoft Word, first ensure your document uses heading styles (Heading 1, Heading 2, etc.) to structure your content. Word uses these heading styles to automatically generate the TOC. Next, place your cursor where you want the TOC to appear. Go to the 'References' tab, and click on 'Table of Contents'. Choose an automatic style from the gallery, or click 'Custom Table of Contents...' for more control over the formatting and which heading levels to include.
To update the TOC, right-click anywhere within the table of contents and select 'Update Field', then choose either 'Update page numbers only' or 'Update entire table'. Updating the entire table will reflect any changes to headings, while updating page numbers only will adjust the page numbers if the content's location has shifted. You can also manually adjust the appearance of TOC elements via the "Custom Table of Contents..." option by modifying the styles.
6. Describe the steps you would take to protect a Word document with a password.
To protect a Word document with a password, follow these steps:
- Open the Word document.
- Go to
File>Info>Protect Document>Encrypt with Password. - Enter a password in the 'Password' box and click
OK. - Re-enter the password to confirm and click
OKagain. - Save the document. The document is now password protected and will require the password to open it. Remember the password; there is no way to recover the document if it is lost.
7. How do you track changes in a Word document, and how do you accept or reject those changes?
To track changes in a Word document, go to the 'Review' tab and turn on 'Track Changes'. Any edits made after this will be highlighted. Insertions are usually shown in a different color and deletions are shown as strikethroughs.
To accept or reject changes, stay on the 'Review' tab. You can use the 'Previous' and 'Next' buttons to navigate through the changes. Use the 'Accept' or 'Reject' buttons to either incorporate the change into the document or discard it. You can also right-click on a specific change to accept or reject it individually. You can also accept or reject all the changes at once.
8. What are macros in Word, and how can they be used to automate repetitive tasks?
Macros in Word are a series of commands and instructions that are grouped together as a single command to automate a task. They are essentially mini-programs that you can create to perform repetitive actions quickly and efficiently. Word macros are written in Visual Basic for Applications (VBA).
Macros can be used to automate a wide variety of tasks, such as formatting documents, inserting boilerplate text, creating tables, and performing calculations. For example, you could create a macro to automatically format all headings in a document to a specific font, size, and color, or to insert your company's address and logo at the beginning of every new document. Here's a simple example of a VBA macro that inserts the current date:
Sub InsertCurrentDate()
  Selection.TypeText Text:=Date
End Sub
9. Explain how to insert and format images in a Word document, including wrapping text around them.
To insert an image in Microsoft Word, navigate to the 'Insert' tab on the ribbon and click 'Pictures'. Select the image file from your computer and click 'Insert'. Once the image is inserted, you can format it by clicking on the image and using the 'Picture Format' tab that appears. This tab allows you to adjust the image's size, apply styles, add borders, and more. For precise sizing, use the 'Height' and 'Width' boxes typically located on the right side of the 'Picture Format' tab.
To wrap text around an image, select the image and click the 'Layout Options' icon that appears next to it, or go to the 'Wrap Text' option in the 'Picture Format' tab (often under 'Arrange'). Choose a wrapping style like 'Square', 'Tight', 'Through', 'Top and Bottom', or 'Behind Text' or 'In Front of Text'. Adjust the image's position to see how the text flows around it. You can also access 'Layout Options' from the right-click menu of the selected image.
10. How can you ensure accessibility of a Word document for people with disabilities?
To ensure accessibility in a Word document, consider the following points. Use descriptive alternative text for all images and non-text elements. Apply proper heading styles to structure the document logically, enabling easy navigation. Use meaningful hyperlink text. Ensure sufficient color contrast between text and background. Use simple and clear language, avoiding jargon.
Run the Accessibility Checker tool in Word (Review > Check Accessibility) to identify and fix potential issues. Save the document in an accessible format like tagged PDF. Test the document with assistive technologies like screen readers.
11. Describe how to create and modify headers and footers in Word.
To create headers and footers in Word, double-click in the top (for header) or bottom (for footer) margin of a page. This activates the header/footer area. Alternatively, go to the 'Insert' tab on the ribbon and choose 'Header' or 'Footer' to select from pre-designed options or create a blank one.
Once the header/footer area is active, a 'Header & Footer Tools' tab appears. Use the options in this tab to insert text, page numbers, dates, images, and other elements. To modify an existing header or footer, simply double-click within the header or footer area to activate it. Changes you make will automatically apply to all pages in the document by default. To create different headers or footers for different sections, you need to insert section breaks and then unlink the header/footer from the previous section using the 'Link to Previous' option in the 'Header & Footer Tools' tab. You can then edit each section's header/footer independently.
12. How do you work with columns in Word, and what are some use cases for using columns?
In Microsoft Word, you can work with columns primarily through the 'Layout' tab, where you'll find a 'Columns' option. Clicking on 'Columns' lets you select preset column layouts (like two, three, or left/right aligned), or choose 'More Columns' to specify the number of columns, width, spacing, and apply the column format to the whole document or a specific section. You can also insert column breaks using 'Breaks' in the 'Layout' tab to control where text flows to the next column.
Use cases for columns include creating newspaper-style layouts for newsletters or brochures, organizing text into easily readable chunks, and efficiently using space on a page. They're also handy for side-by-side comparisons of information, creating visually appealing documents, or simulating multi-column layouts when direct table use isn't ideal.
13. Explain how to use the Find and Replace feature in Word, including advanced search options.
To use Find and Replace in Word, press Ctrl+H (or Cmd+Option+F on Mac) to open the Find and Replace dialog. Enter the text you want to find in the "Find what" field and the replacement text in the "Replace with" field, then click "Replace" to replace individual instances or "Replace All" to replace every instance. For advanced options, click the "More >>" button. This expands the dialog to offer features like:
- Match case: Finds only text with the same capitalization.
- Find whole words only: Finds only complete words, not text within other words.
- Use wildcards: Allows you to use special characters (like
?for any single character or*for any string of characters) to broaden your search. - Sounds like (English): finds words that sound similar to the 'find what' text.
- Find all word forms (English): find inflected form of the word like, find 'sit', also finds 'sat' and 'sitting'.
- Format: Lets you find and replace specific formatting attributes such as font, size, color, or style. You can search for all instances of bold text and replace it with italics, for example. You can also search by styles. Click 'No Formatting' button to clear the formatting if necessary.
- Special: Inserts special characters like tabs, paragraph marks, or em dashes into the Find or Replace fields.
14. Describe how to create and use templates in Word.
To create a template in Word, start by opening a new Word document. Customize the document with the desired formatting, styles, text, and images that you want to reuse. Then, go to File > Save As, and in the 'Save as type' dropdown, select 'Word Template (.dotx)' or 'Word Macro-Enabled Template (.dotm)' if your template contains macros. Choose a location to save the template, such as the default 'Custom Office Templates' folder, which makes it easier to find later. Give your template a descriptive name and click Save.
To use a template, go to File > New. Look for your custom template, typically under the 'Personal' or 'Custom' tab. Click on the template to create a new document based on it. Any changes you make to the new document will not affect the original template, ensuring it remains a reusable starting point. You can also double-click a template file (.dotx or .dotm) to create a new document based on that template.
15. How do you insert special characters and symbols in Word?
In Microsoft Word, you can insert special characters and symbols in several ways. The most common method is to use the Insert tab, then click Symbol and choose either Symbol or More Symbols. This opens a dialog box where you can select the desired character from various fonts and character sets (like Unicode). You can also set a shortcut key for frequently used symbols.
Another method is to use Character Map which is a Windows accessory. Search for 'Character Map' in Windows search bar. Select the symbol you want and copy it, then paste it into your Word document. Lastly, Word supports using Alt codes. Hold down the Alt key and type a specific numeric code on the numeric keypad to insert certain symbols (e.g., Alt + 0169 for the copyright symbol ©).
16. Explain how to use cross-references in a Word document.
Cross-references in Word allow you to link to other parts of the same document, such as headings, figures, tables, and numbered items. To insert a cross-reference, go to the 'Insert' tab, and click on 'Cross-reference'. In the dialog box, choose the reference type (e.g., 'Heading', 'Figure'). Then, select the specific item you want to reference. Finally, choose what you want to display from the reference (e.g., 'Heading text', 'Page number') and click 'Insert'.
Word automatically updates cross-references when the referenced item changes its location or content, ensuring that your document remains accurate. This is especially useful for long documents with many figures and tables, preventing manual updates and reducing errors. You can update all the references by selecting all, right-clicking and select 'Update Field'.
17. How do you embed fonts in a Word document?
To embed fonts in a Word document, go to File > Options. In the Word Options dialog box, select the Save tab. Then, under Preserve fidelity when sharing this document, check the box labeled Embed fonts in the file. You have two options here:
Embed only the characters used in the document: This option reduces the file size but might cause font substitution if the document is edited on another computer with different fonts installed.Do not embed common system fonts: This option further reduces file size by excluding fonts that are typically found on most computers. Ensure the right option is selected for the intended use case.
18. Describe the difference between relative and absolute hyperlinks in Word.
A relative hyperlink in Word specifies the target file's location relative to the current document's location. For instance, if your Word document is in C:\MyDocuments\ and you link to MyPictures\image.jpg, Word assumes the image is located at C:\MyDocuments\MyPictures\image.jpg. This type of link will only work as long as the folder structure between the linked files remains the same. This is good for when you move the entire folder, and the links remain intact.
An absolute hyperlink, on the other hand, specifies the full path to the target file, regardless of the current document's location. In the same example, the absolute link would be C:\MyDocuments\MyPictures\image.jpg. Even if you move the Word document, the link will still point to the same image at that specific location. This is problematic if you move a collection of files together to a new location, as the links will no longer be valid.
19. Explain how to use bookmarks in Word and why they are useful.
In Microsoft Word, bookmarks are named locations you insert within a document for easy navigation and reference. To insert a bookmark, select the text or item you want to bookmark, go to the 'Insert' tab, click 'Bookmark', give it a unique name, and click 'Add'. You can then quickly jump to that location from anywhere in the document by going to 'Insert' > 'Bookmark', selecting the bookmark name, and clicking 'Go To'.
Bookmarks are useful for several reasons. They allow you to quickly navigate to specific sections of a long document. You can also use bookmarks in conjunction with cross-references to link to different parts of the document automatically, ensuring consistency. Furthermore, bookmarks are often used when creating fillable forms in Word, allowing you to programmatically interact with specific locations in the document using VBA or other automation tools.
20. How would you convert a Word document into a PDF, ensuring that all formatting is preserved?
The best way to convert a Word document to PDF while preserving formatting is generally through the "Save as PDF" option within Microsoft Word itself. This method typically handles font embedding, image compression, and layout retention effectively. Alternatively, Adobe Acrobat (if you have a subscription) offers more advanced conversion settings, allowing for fine-tuning of PDF output for specific purposes like print or web.
If automating the conversion via code, libraries like Aspose.Words (C#/.NET), python-docx (Python, read only) + ReportLab/fpdf for recreating, or LibreOffice's headless mode (via command-line) can be used. These options often involve more complexity to ensure perfect fidelity, requiring careful handling of styles, fonts, and layout elements, especially for documents with intricate formatting. For example, using LibreOffice:
libreoffice --headless --convert-to pdf input.docx
Be aware that free online converters often compromise on formatting and may pose security risks; always prefer local solutions or reputable software for sensitive documents.
21. Walk me through the process of creating a multi-level list in Word and explain its formatting options.
To create a multi-level list in Word, you can start by typing your first list item and pressing Enter. Then, click the Multilevel List button in the Paragraph group on the Home tab. Choose a list style or define a new one. For subsequent levels, either use the Increase Indent button (or press the Tab key) to move to the next level, or manually change the level by right-clicking the list item and selecting List > Change List Level.
Word offers extensive formatting options for multi-level lists. These include customizing the numbering or bullet style for each level, adjusting the indentation and spacing, linking levels to heading styles for automatic updates, and defining how the list continues after interruptions (like headings or other paragraphs). You can access these options by clicking on 'Define New Multilevel List' or by modifying an existing one under the Multilevel List dropdown menu. You can also format individual list items by right-clicking them, and choosing the appropriate option.
Advanced Microsoft Word interview questions
1. Explain how you would use macros to automate a repetitive task in Microsoft Word, providing a specific example.
To automate repetitive tasks in Microsoft Word using macros, I'd use the Visual Basic for Applications (VBA) editor. First, I'd identify the task I want to automate. For example, let's say I frequently need to format a specific phrase in a document as bold, italicized, and with a specific font color (e.g., blue). I would start recording a macro, perform the formatting steps manually once, and then stop recording. The macro recorder translates my actions into VBA code.
Then, I can assign a keyboard shortcut to this macro. In the VBA editor, I can also modify the generated code, for instance, to make the macro more flexible. Below is an example:
Sub FormatPhrase()
  Selection.Find.ClearFormatting
  Selection.Find.Replacement.ClearFormatting
  With Selection.Find
    .Text = "specific phrase"
    .Replacement.Text = "specific phrase"
    .Forward = True
    .Wrap = wdFindContinue
    .Format = True
    .MatchCase = False
    .MatchWholeWord = False
    .MatchWildcards = False
    .MatchSoundsLike = False
    .MatchAllWordForms = False
  End With
  With Selection.Replacement.Font
    .Bold = True
    .Italic = True
    .Color = wdColorBlue
  End With
  Selection.Find.Execute Replace:=wdReplaceAll
End Sub
This code finds every instance of "specific phrase" and applies the formatting.
2. Describe a situation where you would use mail merge and outline the steps involved in setting it up.
I would use mail merge when I need to create personalized documents (like letters, emails, or labels) for a large group of recipients, drawing data from a structured source such as a spreadsheet or database. For example, sending out personalized marketing emails to customers.
The typical steps to set up a mail merge are:
- Prepare the data source: Ensure the spreadsheet or database contains all the necessary fields (name, address, etc.) and is clean and accurate.
- Create the main document: Write the base document (letter, email, etc.) in a word processor like Microsoft Word.
- Link the data source: Connect the main document to the data source (e.g., by selecting the spreadsheet file in Word's Mailings tab).
- Insert merge fields: Place placeholders (merge fields) in the main document where personalized information should appear (e.g.,
<<FirstName>>,<<LastName>>). - Preview and test: Preview the merged documents to ensure the data is being populated correctly and make any necessary adjustments.
- Complete the merge: Execute the mail merge to generate the individual documents or send the emails, selecting options such as merging to a new document, directly to a printer, or sending as email.
3. How would you create a fillable form in Microsoft Word, and what are some considerations for making it user-friendly?
To create a fillable form in Microsoft Word, start by enabling the Developer tab (File > Options > Customize Ribbon). Then, in the Developer tab, you can use the Controls group to insert various form fields like text fields, drop-down lists, date pickers, and checkboxes. After inserting a control, use the Properties button to customize its behavior, such as setting default text or restricting input types. Finally, restrict editing to 'Filling in forms' under the Restrict Editing pane to prevent users from modifying the document structure.
For user-friendliness, keep the form simple and uncluttered with clear labels for each field. Use appropriate control types based on the expected input (e.g., drop-downs for predefined choices, date pickers for dates). Provide default values or placeholder text where helpful to guide users. Ensure sufficient spacing between form elements, and test the form thoroughly to identify any usability issues.
4. Explain the difference between bookmarks and cross-references in Word and how you would use them in a long document.
Bookmarks and cross-references are both features in Word used for navigation within a document, but they serve different purposes. A bookmark is essentially a named location within a document. You insert a bookmark to mark a specific point, like a paragraph or image, so you can quickly return to it later using the 'Go To' function. Bookmarks themselves don't display any text or automatically update if the bookmarked content changes.
Cross-references, on the other hand, are dynamic links to other parts of your document. They actively display text from the referenced location (like a heading or figure caption) and automatically update if that text changes. For example, you can cross-reference a figure caption, and the text in the cross-reference will always match the current figure caption. In a long document, I would use bookmarks for personal navigation to specific points I need to revisit for editing. I would use cross-references to create dynamic links to figures, tables, and headings, ensuring that references throughout the document stay consistent even when the content is modified.
5. Describe how you would protect a Word document from unwanted changes, and what are the different levels of protection available?
To protect a Word document from unwanted changes, I would use the "Restrict Editing" feature. This can be found under the "Review" tab, then "Protect", then "Restrict Editing". This allows you to limit the types of changes people can make.
The different levels of protection available include:
- Tracked Changes: Allows changes but forces them to be tracked for review.
- Comments: Only allows users to add comments.
- Filling in Forms: Only allows users to fill in form fields. Useful for templates where you want users to only input data into designated areas.
- No Changes (Read only): Completely locks the document, preventing any edits. You can also set a password to further restrict who can remove the protection.
6. How would you create a table of authorities in a legal document using Microsoft Word?
To create a Table of Authorities in Microsoft Word, first mark citations within your document. Select the citation, press Alt+Shift+I, choose the appropriate category (e.g., Cases, Statutes), and short cite. Once all citations are marked, go to the References tab, click 'Insert Table of Authorities', and customize the table's appearance and categories. Word will automatically compile the table based on the marked citations, numbering pages and organizing entries by category.
Further, you can easily update the Table of Authorities later on. If you add or modify citations, simply right-click within the Table of Authorities and select 'Update Field'. This will refresh the table to reflect the latest changes in your document. You can also edit entries directly via the 'Edit Citation' option when right clicking.
7. Explain how to use the 'Track Changes' feature effectively in a collaborative writing environment.
To use 'Track Changes' effectively in collaborative writing, first, ensure everyone in the team has the feature enabled in their word processing software (e.g., Microsoft Word, Google Docs). All edits, including insertions, deletions, and formatting changes, will then be visible and attributed to the respective author. Review changes regularly, accepting or rejecting them as appropriate. Use comments to discuss proposed alterations and clarify reasoning behind specific edits, fostering a clear communication trail for all collaborators.
8. Describe the steps you would take to embed a font in a Word document and why you might want to do so.
To embed a font in a Word document, go to File > Options > Save. Then, under "Preserve fidelity when sharing this document", check the box that says "Embed fonts in the file". You can also choose to embed only the characters used in the document to reduce file size, or embed all characters for editing purposes.
Embedding fonts ensures that the document appears as intended on other computers, even if they don't have the same fonts installed. This is important for maintaining consistent formatting and readability, especially when sharing documents with others or presenting them on different devices. Without embedding, the recipient's computer might substitute a different font, altering the document's appearance.
9. How can you ensure accessibility in a Word document for users with disabilities?
To ensure accessibility in a Word document, several steps can be taken. First, use proper heading styles to structure the document logically, enabling screen readers to navigate easily. Provide alternative text for all images and non-text elements so users understand their content. Ensure sufficient color contrast between text and background for readability, and avoid relying solely on color to convey information. Use clear and concise language, and check the document with Word's built-in Accessibility Checker to identify and fix potential issues, such as missing alt text or insufficient contrast. Finally, use meaningful hyperlink text instead of generic phrases like "click here", and ensure tables are structured with header rows for screen reader compatibility.
10. Explain how you would use the Styles pane to create a consistent look and feel across a large document.
The Styles pane in word processors like Microsoft Word is a powerful tool for ensuring a consistent look and feel across a large document. I would leverage it by first defining a set of styles that represent the desired formatting for various document elements such as headings, body text, quotes, and lists. This involves selecting an element, formatting it as desired, and then creating a new style based on that formatting, giving it a meaningful name (e.g., 'Heading 1', 'Body Text', 'Quote Text').
Once the styles are defined, I would apply them consistently throughout the document. Instead of manually formatting each element, I would select the element and then click the corresponding style in the Styles pane. This ensures that all elements of the same type share the same formatting, guaranteeing consistency. If a global change is needed (e.g., changing the font of all headings), I can simply modify the style definition in the Styles pane, and all instances of that style will be updated automatically throughout the document. This greatly simplifies formatting and maintenance, especially in large documents.
11. Describe how you would manage different versions of a Word document and revert to an older version if needed.
I would manage different versions of a Word document using a version control system like Git or by leveraging Word's built-in version history features. For Git, I would treat the document as a binary file and commit changes with meaningful messages after each significant edit. To revert, I could use git checkout <commit-hash> <file_name> to retrieve a specific version.
Alternatively, Word's built-in version history (if enabled through OneDrive or SharePoint) allows browsing and restoring previous versions directly within the application. I would regularly save the document to ensure that each revision is captured by the version history feature. This would also allow me to compare different versions easily.
12. How do you insert and manage citations and bibliographies in Microsoft Word using a citation management tool (like EndNote or Zotero)?
Using a citation management tool like EndNote or Zotero in Microsoft Word involves installing the tool and its corresponding Word plugin. Once installed, a new tab (e.g., "EndNote" or "Zotero") appears in Word's ribbon. To insert a citation, you simply position the cursor where you want the citation, then select the desired reference from your EndNote or Zotero library using the plugin. The plugin automatically inserts a formatted citation in your document (e.g., in-text citation like (Author, Year)).
Managing the bibliography is also straightforward. After inserting all citations, place the cursor where you want the bibliography to appear and click the "Insert Bibliography" button in the EndNote/Zotero tab. The tool then automatically generates a formatted bibliography based on the citations in your document and the chosen citation style (e.g., APA, MLA, Chicago). You can easily change the citation style, and the tool will update both the in-text citations and the bibliography accordingly. These tools automate citation formatting and bibliography generation, saving time and ensuring consistency.
13. Explain how to create and customize headers and footers in a Word document, including different headers/footers for different sections.
To create headers and footers in Word, double-click in the top (header) or bottom (footer) margin of a page. This opens the header/footer area for editing. You can then type text, insert page numbers, dates, or other information. To customize, use the "Header & Footer Tools Design" tab that appears when the header/footer area is active. From there, you can insert pre-designed headers/footers, change the position, and control options like "Different First Page" or "Different Odd & Even Pages".
To create different headers/footers for different sections, you first need to insert section breaks (Page Layout > Breaks). After inserting the break, in the header/footer area of the new section, deselect "Link to Previous" in the "Header & Footer Tools Design" tab. This will allow you to create unique headers/footers for that section without affecting the previous ones. You can then customize each section's header and footer independently.
14. Describe how you would use the 'Outline View' in Word to organize and navigate a complex document.
I would use Word's Outline View to structure and navigate long documents by assigning heading levels to different sections. This allows me to collapse and expand sections, making it easier to focus on specific parts or rearrange the document's overall structure. I can quickly jump between major topics and subtopics using the navigation pane that the Outline View provides, significantly improving my workflow when dealing with complex documents.
Specifically, I'd assign Heading 1 to main chapters, Heading 2 to major sections within those chapters, and so on. This hierarchical structure allows me to easily see the document's organization, move entire sections around with drag-and-drop functionality, and promote or demote heading levels to refine the document's flow. The Outline View essentially gives a bird's-eye view of the entire document and facilitates structural editing.
15. How would you troubleshoot a corrupted Word document and attempt to recover its contents?
To troubleshoot a corrupted Word document, I'd first try opening it in Word and letting Word attempt automatic repair. If that fails, I would try opening it on a different computer, or a different version of Word. If still not opening, I would try opening it in 'safe mode' (winword /safe) to disable add-ins that may be interfering. I'd also try opening the file with 'Recover Text from Any File' option.
If opening in Word still doesn't work, I'd try opening the file in a different program that supports Word documents, like Google Docs or LibreOffice Writer. I might also try to extract the text using a text extraction tool or even rename the file extension to .zip, and then extract the contents, looking for text-based files. As a last resort, I would try a dedicated document recovery software.
16. Explain how to create and use templates in Microsoft Word to standardize document creation.
Templates in Microsoft Word provide a blueprint for creating standardized documents. To create a template, start with a new or existing Word document. Customize it with specific formatting, logos, boilerplate text, and styles. Then, save the file as a Word Template (.dotx) file. This file will serve as the base for new documents.
To use a template, go to 'File' -> 'New'. You'll see options for featured and personal templates. Select the template you created. A new document based on that template will open, preserving the standardized formatting and content. Users can then fill in the variable parts of the document without altering the core design, ensuring consistency across multiple documents.
17. Describe how you would use the 'Compare' feature in Word to identify differences between two versions of a document.
To use the 'Compare' feature in Word, I would first open one of the documents. Then, I would go to the 'Review' tab and click on the 'Compare' button. In the dialog box that appears, I would select the original document and the revised document. I would then click 'OK'.
Word will then create a new document that shows the differences between the two documents. Insertions, deletions, and formatting changes are typically marked using tracked changes (different colors and symbols). You can then review and accept or reject each change individually.
18. How do you embed different types of objects (e.g., Excel charts, videos) into a Word document, and what are the advantages/disadvantages of each method?
You can embed objects into a Word document using linking or embedding. Linking creates a connection to the source file; changes in the source are reflected in the Word document. Embedding, on the other hand, inserts a copy of the object into the Word document; changes to the source file won't affect the embedded object.
Advantages of linking include smaller file sizes (since the entire object isn't stored) and automatic updates. Disadvantages include the reliance on the source file remaining accessible; if the source is moved or deleted, the link breaks. Advantages of embedding include portability (everything is contained within the Word document) and independence from the source file. A key disadvantage is increased file size. To embed, you typically use 'Insert' -> 'Object' -> 'Create from File' and uncheck the 'Link to File' option. To link, you perform the same steps, but check the 'Link to File' option.
19. Explain how to use advanced find and replace options, such as wildcards and regular expressions, in Word.
Word's advanced find and replace leverages wildcards and regular expressions (though implemented with a specific syntax). To access it, open the 'Find and Replace' dialog (Ctrl+H). Check the 'Use wildcards' box to enable wildcard options. Common wildcards include * (zero or more characters), ? (any single character), < (start of a word), > (end of a word), [] (character set), and [!x] (any character except x). For example, s*d finds 'sad', 'started', 'scheduled'. To find literal wildcard characters, escape them with a backslash, e.g., \* finds an asterisk.
Word's 'Use wildcards' feature also contains a somewhat limited but useful form of regular expressions. You can use {n} to specify the number of occurrences of a character or expression. For example, [0-9]{3} finds any sequence of three digits. Parentheses () can be used to group expressions, and \n can be used in the Replace field to refer to the nth group found in the Find field. For example, finding (Mr)(.*) and replacing with Ms \2 would change 'Mr Smith' to 'Ms Smith', and 'Mr Jones' to 'Ms Jones'.
20. Describe how to create a master document and subdocuments in Word for managing large, multi-part projects.
In Word, a master document is a container for subdocuments, which are individual Word files. To create one, start a new Word document and go to the 'View' tab, then click 'Outline'. In the outlining view, you can insert existing Word documents as subdocuments by going to 'Show Document' then 'Insert'. Alternatively, you can create new, blank subdocuments. This allows you to divide a large project into manageable sections and work on them independently. The master document allows for easy navigation, consistent formatting, and centralized management of the overall project.
To manage the subdocuments, you can collapse or expand them within the master document view. Changes made in a subdocument are reflected in the master document and vice versa. The master document can be used to apply consistent styles and numbering across all subdocuments. When finished, you can print or export the master document, and it will automatically include all the content from its subdocuments.
21. How would you use VBA (Visual Basic for Applications) to create a custom function or automation in Microsoft Word?
To create a custom function or automation in Word using VBA, you first access the VBA editor by pressing Alt + F11. Then, you insert a new module (Insert > Module). Within the module, you can write your VBA code. For a custom function, use the Function keyword followed by the function name, parameters, and return type. For example:
Function AddNumbers(num1 As Integer, num2 As Integer) As Integer
    AddNumbers = num1 + num2
End Function
To automate tasks, use the Sub keyword followed by the subroutine name. You can then interact with the Word object model to manipulate documents, text, etc. For example:
Sub BoldFirstParagraph()
    With ActiveDocument.Paragraphs(1).Range
        .Bold = True
    End With
End Sub
Once the code is written, you can run the subroutine directly from the VBA editor or call the custom function from within a Word document (e.g., in a formula field, =AddNumbers(1,2)). For automation subroutines, you might assign the macro to a button or ribbon control.
22. Explain how to create custom keyboard shortcuts in Word to improve your efficiency.
To create custom keyboard shortcuts in Word, navigate to File > Options > Customize Ribbon. At the bottom of the Customize Ribbon pane, click the Customize... button next to "Keyboard shortcuts".
In the Customize Keyboard dialog, select a category (e.g., "File", "Macros", "Styles") and then select a command within that category. In the "Press new shortcut key:" box, enter your desired key combination. Word will indicate if the shortcut is already assigned. If the combination is available, click Assign and then Close. Your new shortcut will now execute the specified command. Consider choosing shortcuts that are easy to remember and not already in use for other common tasks.
23. Describe how you would prepare a Word document for professional printing, including considerations for margins, bleed, and color management.
To prepare a Word document for professional printing, I'd first adjust the margins to accommodate binding and trimming. A standard margin of 1 inch is a good starting point, but more may be needed depending on the binding method. Next, I'd incorporate bleed by extending any elements that should reach the edge of the printed page (like images or colored backgrounds) at least 0.125 inches beyond the trim line. This prevents white edges from appearing if the paper is not cut precisely. Finally, I'd convert the document to PDF/X-1a format, which embeds fonts and color profiles. This ensures that the colors appear consistent and that the printer has all the necessary resources to accurately reproduce the document.
Specifically for color management, I'd ensure all images are CMYK and any colors used within Word are also defined using CMYK values, as this is the standard for print. I'd avoid RGB colors as they can be converted differently by various printers, leading to unexpected results. I would also use the PDF/X-1a format to ensure that the correct color profile is embedded in the PDF.
Expert Microsoft Word interview questions
1. Explain the differences between using bookmarks and hyperlinks in a Word document, especially in the context of large documents with cross-references.
Bookmarks in Word act as named anchors within a document, allowing you to mark specific locations. Hyperlinks, on the other hand, are links that, when clicked, navigate the user to a specified destination, which could be a bookmark within the same document, a different document, or a website. Bookmarks define the target location; hyperlinks provide the navigation to that location.
In large documents with cross-references, bookmarks are crucial for creating internal navigation. You define a bookmark at the target of the reference (e.g., a specific section). Then, you create a hyperlink that points to that bookmark. This allows users to quickly jump to the referenced section. Without bookmarks, cross-referencing would be cumbersome and require manually searching through the document. Hyperlinks use bookmarks to make it easier to navigate within the document.
2. Describe a scenario where you would use a macro in Word to automate a complex or repetitive task. Provide specific examples of the macro's functionality.
A good scenario for using a Word macro is to automate the formatting and standardization of legal documents. Many legal documents require specific formatting for citations, headings, and clause numbering. A macro could automate these tasks, ensuring consistency and saving time. For example, imagine I need to format hundreds of contracts with these requirements:
- All citations must be in italicized Times New Roman, 12pt font, enclosed in square brackets.
- All headings must be in bold, Arial, 14pt font, and automatically numbered.
- Each clause needs to start with a numbered bullet point.
A macro could be created to automatically apply these formatting rules to selected text or the entire document. The functionality would include:
- Finding and formatting citations: Search for patterns that match citation formats (e.g., "Section [number]", "Article [number]") and apply the correct font, style, and bracket formatting.
- Formatting Headings: Identify text marked as headings (possibly based on existing style or user selection) and apply the bold, Arial, 14pt font along with automatic numbering.
- Applying Clause numbering: Identifying paragraphs and formatting the starting of each paragraph with auto-incrementing bullet numbering. This automated approach saves considerable time and ensures all documents adhere to the correct legal standards.
3. How would you troubleshoot a Word document that is consistently crashing or freezing when working with large images or embedded objects?
To troubleshoot a crashing or freezing Word document with large images/embedded objects, start by checking system resources: ensure sufficient RAM and CPU availability. Close unnecessary applications. Then, within Word:
- Try opening Word in Safe Mode (word /safe) to disable add-ins that might be causing conflicts.
- Update your graphics card drivers.
- Compress images within the document (Picture Format -> Compress Pictures).
- Consider linking instead of embedding objects.
- If the issue persists, try repairing the Word installation through the Control Panel. Finally, consider copying the content into a new Word document to eliminate document corruption.
4. Explain how to use the 'XML Mapping Pane' in Word to create structured documents that can be easily exported and imported into databases or other applications.
The XML Mapping Pane in Word allows you to bind elements from an XML schema to content controls within your Word document. This creates a structured document where specific parts of the document are associated with particular XML elements. First, load your custom XML schema (xsd) into Word via the Developer tab (you may need to enable this tab in Word options). Then, use the XML Mapping Pane (also under the Developer tab) to view the schema. Drag elements from the pane onto your document. Word will create content controls (like text boxes, dropdown lists, or date pickers) bound to those XML elements.
Populating the content controls with data automatically generates XML conforming to your schema. You can then save the document as a Word XML Document (.xml) which represents the data in a structured format ready for export. Conversely, you can import data from a valid XML file (conforming to the schema) into a Word document with mapped content controls, populating the document with the XML data. This facilitates easy data exchange between Word and databases or other applications that can process XML. The structure is defined by your schema and the pane acts as the connector between the document and the schema.
5. Describe the process of creating and managing a table of authorities in Word, including citation formatting and updating the table automatically.
To create a Table of Authorities (TOA) in Word, you first need to mark citations within your document. Select the citation text, then go to References > Mark Citation. Choose the appropriate category (e.g., Cases, Statutes) and short citation, and click "Mark" or "Mark All". Customize citation formats by clicking 'Category' and selecting modify. After marking all citations, insert the TOA by going to References > Table of Authorities > Insert Table of Authorities. Choose the category to include, customize the appearance, and click OK. Word uses fields for the TOA so to update the table automatically to reflect new citations or changes, right-click the TOA and select "Update Field".
Citation formatting within the TOA can also be modified. Go to References > Table of Authorities > Insert Table of Authorities, then click "Modify". You can modify the TOA styles from here (e.g., TOA Heading, TOA 1, TOA 2, etc.) to change the font, size, and other formatting attributes. Remember that these styles are linked directly to the Table of Authorities, so changes will update accordingly upon refreshing the TOA.
6. Explain how you would use Word's 'Mail Merge' feature to personalize and send out a large batch of emails, including handling conditional content based on recipient data.
To use Word's Mail Merge for personalized emails, I'd start by creating a Word document with placeholders (merge fields) where I want personalized data. Then, I'd connect it to a data source, like an Excel spreadsheet, containing recipient information (name, address, etc.). Within Word, I'd use the Mailings tab to insert the merge fields into the document. To handle conditional content (e.g., different greetings based on gender), I would use Word's rules feature (If...Then...Else). This lets me specify conditions based on the data source fields. Finally, I would preview the merged results to ensure accuracy and then complete the merge, choosing the option to merge to email. Word would then send individual, personalized emails to each recipient using the data from the data source.
7. How would you create a custom style set in Word that ensures consistent formatting across multiple documents, and how would you share this style set with other users?
To create a custom style set in Word, start by formatting a section of text with the desired appearance (font, size, spacing, color, etc.). Then, select the formatted text, and in the Styles pane (usually found under the 'Home' tab), click the 'More' arrow and choose 'Create a Style'. Name the new style and click 'Modify' to refine its settings. Save the document as a Word Template (.dotx) to preserve the styles.
To share the style set, simply distribute the .dotx template file to other users. They can then copy the .dotx file to their Word template folder (typically located in their user profile under AppData\Roaming\Microsoft\Templates) or double-click the .dotx file and create a new document from it, which will use the custom style set. Alternatively, you can create a document using the custom template, and then other users can save the styles into their default template using the Organizer dialogue.
8. Describe the steps involved in using Word's 'Compare Documents' feature to identify and merge changes between two versions of a document, including resolving conflicts.
To compare and merge documents in Word, first open one of the documents. Then, go to the 'Review' tab and click on 'Compare'. In the 'Compare Documents' dialog box, select the original document and the revised document. Word will then display the differences between the two documents using tracked changes. You can review these changes and accept or reject them individually. If there are conflicts, Word will highlight them and allow you to choose which version to keep. After resolving all the changes and conflicts, save the merged document as a new file.
9. Explain how to use Word's 'Document Inspector' to remove hidden metadata and personal information from a document before sharing it externally.
To remove hidden metadata and personal information from a Word document using the Document Inspector, follow these steps:
- Open the Word document.
- Go to File > Info.
- Click on Inspect Document and then select Inspect Document from the dropdown menu.
- In the Document Inspector dialog box, check the boxes for the types of information you want to remove (e.g., Comments and Revisions, Document Properties and Personal Information, Hidden Text).
- Click Inspect.
- Review the inspection results. For each category, click Remove All to delete the corresponding data. Be careful, as this action is usually irreversible.
- Click Reinspect to confirm all information has been removed, or close the Document Inspector when finished. Save the document to finalize the changes.
10. How would you embed a custom font in a Word document to ensure that it displays correctly on other computers, even if the font is not installed?
To embed a custom font in a Word document, go to File > Options > Save. Then, check the box labeled "Embed fonts in the file". You can choose to embed all characters or only the characters used in the document, which reduces file size but may limit editing on other systems if additional characters are needed.
Keep in mind that embedding fonts might increase the file size of the document. Also, font embedding is subject to licensing restrictions; some fonts may not permit embedding.
11. Describe the process of creating and using a master document with subdocuments in Word, including managing cross-references and updating the table of contents.
Creating a master document involves first preparing your subdocuments, ensuring each is a self-contained Word file. In the master document, go to View > Outline. Use the 'Show Document' group to 'Insert' existing Word documents as subdocuments. To manage cross-references, first insert bookmarks in the subdocuments to the items you want to reference. In the master document, use Insert > Cross-reference, select 'Bookmark' as the reference type, and choose the appropriate bookmark. Word automatically updates the page numbers. For the table of contents, navigate to References > Table of Contents, and select an automatic table style. To ensure it's updated, right-click the table of contents and select 'Update Field'. You might need to update entire table if subdocuments were modified significantly.
When working with master and subdocuments, it is vital to keep the subdocuments independent and ensure consistent formatting. Regularly update the table of contents and cross-references before finalizing the document. This process will ensure a professional-looking and easily navigable final document, even when dealing with complex, multi-part publications.
12. Explain how to use Word's 'Track Changes' feature effectively in a collaborative editing environment, including accepting or rejecting changes and adding comments.
To effectively use Word's 'Track Changes' feature in collaborative editing, first enable it by going to the 'Review' tab and toggling 'Track Changes' on. As you and your collaborators edit, Word will mark insertions, deletions, and formatting changes. To review changes, use the 'Previous' and 'Next' buttons in the 'Review' tab to navigate through them. To accept a change, click the 'Accept' button; to reject, click 'Reject'. You can accept or reject changes individually or all at once.
Adding comments is also crucial for effective collaboration. To add a comment, select the text you want to comment on, then click 'New Comment' in the 'Review' tab. Type your comment and post it. Other collaborators can reply to your comments, creating a discussion thread. Resolve comments once the issue is addressed by clicking the 'Resolve' button on the comment. This keeps the document clean and helps track progress. Always communicate clearly and respectfully within the comments to ensure a smooth collaborative editing process.
13. How would you create a fillable form in Word that can be easily completed by users, including adding form fields and protecting the document from unauthorized changes?
To create a fillable form in Word, start by enabling the Developer tab (File > Options > Customize Ribbon > check 'Developer'). Then, in the Developer tab, use the Controls group to insert various form fields like text boxes, dropdown lists, date pickers, and checkboxes. Position and customize these fields as needed within your document.
After adding form fields, restrict editing to prevent unauthorized changes. Go to the Developer tab and click 'Restrict Editing'. In the Restrict Editing pane, select 'Filling in forms' under Editing restrictions. Finally, click 'Yes, Start Enforcing Protection' and set a password (optional but recommended) to prevent users from removing the restrictions. Save the document as a Word Template (.dotx) to preserve the form fields for repeated use, or as a regular Word document (.docx) if the form is intended for single use.
14. Explain the differences between using the 'Insert Picture' command and the 'Insert Online Pictures' command in Word, especially in terms of file size and image quality.
The 'Insert Picture' command in Word inserts images directly from your local computer or network drive. This means the entire image file is embedded within the Word document, potentially increasing the document's file size, especially for high-resolution images. The image quality remains consistent as it's the original file.
In contrast, 'Insert Online Pictures' typically inserts images via a link to an online source (e.g., Bing Images, OneDrive). Only a reference or a smaller, optimized version of the image is embedded, leading to smaller Word file sizes. However, image quality might be reduced due to compression or limitations of the online source, and the image relies on the availability of the online source. If the online source is unavailable the image cannot be displayed.
15. Describe how to use Word's 'Equation Editor' to create complex mathematical equations and symbols, including formatting and alignment options.
Word's Equation Editor (now often using MathType or built-in UnicodeMath) allows creation of complex equations. You can access it via 'Insert' -> 'Equation'. For symbols, the ribbon interface provides a symbol gallery. Common symbols can be inserted directly. To build more complex structures, use the 'Structures' section (fractions, radicals, integrals, matrices, etc.). Select a structure, then fill in placeholders. UnicodeMath allows typing equations directly using specific codes (e.g., \alpha for α). Formatting options, such as changing font size, style (bold, italic), and alignment (left, center, right), can be applied to the equation as a whole or to individual components. Alignment often adjusts automatically based on the equation structure, but you can fine-tune it using spacing options within the editor.
For example, to insert a fraction, select the fraction structure. Then, click the top and bottom placeholders to enter the numerator and denominator. For a superscript, use the superscript structure and enter the base and exponent. Keyboard shortcuts like Ctrl + = for subscript and Ctrl + Shift + = for superscript are also helpful. Some older versions rely on a specific set of keystrokes for symbols. Newer versions more closely follow LaTeX conventions or provide interactive suggestions. For advanced customization, MathType offers more advanced features than the built-in Equation Editor.
16. Explain how you would integrate Word with other Microsoft Office applications, such as Excel or PowerPoint, to create dynamic documents or presentations.
To integrate Word with Excel or PowerPoint for dynamic documents, I'd primarily leverage features like Object Linking and Embedding (OLE). For Excel, I could embed a worksheet directly into a Word document. Changes made in the Excel source file would then automatically update in the Word document (if linked) or remain static if embedded. Similarly, I can copy Excel charts into Word, linking them so that when the underlying Excel data changes, the chart in Word reflects those changes. For PowerPoint, I can embed Word documents or portions of them as objects or create linked objects. This allows me to use Word as an editor for textual content within a presentation, keeping content synchronized. Another method is to use mail merge functionality in Word with an Excel spreadsheet as the data source for creating personalized documents.
Beyond OLE and mail merge, VBA scripting provides more advanced integration options. Using VBA within Word, I can access and manipulate Excel or PowerPoint objects programmatically. For instance, I could write a macro in Word to automatically update charts in a document based on the latest data in an Excel file. This level of integration enables complex workflows and automated document generation based on external data sources.
17. How can you ensure accessibility compliance in a Word document for users with disabilities, including adding alt text to images and using appropriate heading styles?
To ensure accessibility compliance in a Word document, several steps are crucial. First, add alternative text (alt text) to all images and non-text elements. This provides a textual description for screen readers, allowing users with visual impairments to understand the content. Right-click on the image, select 'Edit Alt Text', and provide a concise and descriptive explanation of the image's purpose or content. Avoid generic phrases like 'image of' or 'picture of'.
Second, use appropriate heading styles (Heading 1, Heading 2, etc.) to structure the document logically. This helps screen reader users navigate the document efficiently and understand the hierarchy of information. Avoid manually formatting text to look like headings. Instead, use the built-in heading styles in the 'Styles' pane. Additionally, use the Accessibility Checker (File > Info > Check for Issues > Check Accessibility) to identify and fix any accessibility issues. Ensure sufficient color contrast, clear and concise language, and proper table structure.
18. Describe a situation where you had to recover a corrupted Word document, and explain the steps you took to restore it to its original state.
Once, a critical project document became corrupted, displaying gibberish upon opening. First, I tried opening it in "safe mode" within Word, which disables add-ins that might be causing problems. When that didn't work, I attempted to open it using Word's "Recover Text from Any File" converter. This extracted the raw text, losing formatting, but allowing me to salvage the core content. Then I recreated the document, pasting the recovered text and re-formatting it to match the original, referencing a printed version I had saved. This was tedious, but avoided having to completely rewrite the document.
19. Explain how to create and use custom keyboard shortcuts in Word to speed up common tasks, such as formatting or inserting symbols.
To create custom keyboard shortcuts in Word, go to File > Options > Customize Ribbon. Click the "Customize..." button next to "Keyboard shortcuts." In the Categories list, select the category of the command you want to assign a shortcut to (e.g., "Styles" for formatting). Then, in the Commands list, select the specific command (e.g., "Heading 1"). Click in the "Press new shortcut key" box and press the key combination you want to use. If the shortcut is already assigned, Word will tell you. Click "Assign" to save the shortcut, and then "Close" to exit the customization dialog.
To use the custom keyboard shortcut, simply press the assigned key combination while working in Word. For example, if you assigned Ctrl+Shift+1 to "Heading 1", pressing those keys will apply the Heading 1 style to the selected text. This significantly speeds up repetitive tasks by avoiding the need to navigate through menus or toolbars.
20. How would you manage version control in Word without relying on external software like SharePoint, especially when multiple people are collaborating on the same document?
Without external version control, managing revisions in Word collaboratively is challenging but doable with disciplined practices. I'd rely heavily on Word's built-in "Track Changes" feature, requiring all collaborators to use it diligently. We'd also use clear naming conventions when saving versions, such as document_v1_initials.docx, document_v2_initials.docx, to keep track of who made which changes and when. Regular communication is key; we'd need to discuss significant changes and decisions proactively to avoid conflicts.
To merge changes, one person would act as the 'integrator,' accepting or rejecting changes from different versions sequentially, creating a final version. While this method is manual and prone to errors, it's a viable option when external version control isn't available. Backups are crucial, saving copies of each version prevents data loss in case of accidental overwrites or deletions.
21. Describe the process of creating and using a custom watermark in Word, including adding text or images and controlling its transparency and position.
To create a custom watermark in Word, go to the 'Design' tab and click 'Watermark'. Select 'Custom Watermark'. In the 'Printed Watermark' dialog, you can choose between a 'Picture watermark' or a 'Text watermark'. For a picture, select the image file, adjust the scale, and choose whether to 'Washout' the color for transparency. For text, enter the desired text, select the font, size, color, and layout (diagonal or horizontal), then adjust transparency.
To control the position, Word automatically places the watermark in the center, but you can manually adjust it by opening the header or footer area (double-click near the top or bottom of the page), selecting the watermark object, and moving or resizing it as needed. You can adjust the transparency of the image or text using the 'Washout' option or directly modifying the picture's transparency settings in the 'Format Picture' pane.
22. Explain how to troubleshoot printing issues in Word, such as incorrect margins, missing content, or unexpected formatting changes.
To troubleshoot printing issues in Word, start by checking the obvious: is the printer online and properly connected? Next, verify your page setup in Word (Layout tab). Incorrect margins, paper size, or orientation can cause problems. Look for the 'Margins,' 'Size,' and 'Orientation' options. Also, inspect the 'View' settings; sometimes switching to 'Print Layout' view can reveal formatting inconsistencies not visible in other views like 'Draft' or 'Web Layout'. If content is missing, ensure it's not hidden (File > Options > Display > Hidden text) or unintentionally excluded from the print range in the print settings (File > Print).
If formatting is unexpected, clear any manual formatting applied directly to the text. Use 'Clear All Formatting' (select text > Home > Font > Clear All Formatting icon), or check for style inconsistencies (Styles pane - Alt+Ctrl+Shift+S). Examine headers and footers, as these might have incorrect settings affecting the entire document. Finally, try printing to PDF first. If the PDF prints correctly, the issue is likely with your printer driver. Consider updating or reinstalling the printer driver from the manufacturer's website.
23. How would you use Word's 'Thesaurus' and 'Grammar Checker' features to improve the clarity and accuracy of your writing?
I use Word's Thesaurus to find alternative words that more precisely convey my intended meaning. This helps to avoid repetition and add nuance to my writing. I'll often right-click a word and explore the suggestions, ensuring the replacement maintains the correct context and tone. If a simpler, clearer synonym exists, I'll prefer it.
For grammar and clarity, I utilize the Grammar Checker to identify errors in punctuation, sentence structure, and word usage. I carefully review each suggestion, accepting those that improve accuracy and clarity while rejecting any that alter the intended meaning or style. I rely on it to catch common mistakes like subject-verb agreement issues, incorrect tense, and passive voice constructions that can weaken writing.
Microsoft Word MCQ
Question 1.
Which of the following methods is the most direct way to change the font size of selected text in Microsoft Word?
Options:
Options:
Question 2.
Which of the following is the correct way to insert a header into your Microsoft Word document? options:
Options:
Question 3.
Which of the following is the correct sequence of steps to insert a table into a Microsoft Word document?
Options:
Options:
Question 4.
Which of the following steps will insert a picture from a file into your Word document? options:
Options:
Question 5.
Which tab in Microsoft Word allows you to adjust the page margins?
Options:
Question 6.
Which of the following steps will insert page numbers at the bottom of every page in your Word document?
Options:
Question 7.
Which of the following methods is the quickest way to apply bold formatting to selected text in Microsoft Word? options:
Options:
Question 8.
Which of the following methods is the MOST efficient way to add a bullet point to an existing list in Microsoft Word?
Options:
Options:
Question 9.
You want to insert a hyperlink to an external website within your Word document. Which of the following steps will accomplish this task?
options:
Options:
Question 10.
Which of the following methods allows you to change the line spacing of a paragraph in Microsoft Word?
options:
Options:
Question 11.
Which of the following steps will allow you to add a custom text watermark to your Word document?
Options:
Question 12.
Which tab in Microsoft Word contains the 'Shapes' option, allowing you to insert various shapes like rectangles, circles, and arrows into your document?
Options:
Options:
Question 13.
Which of the following steps will allow you to add a comment to a specific word within a Microsoft Word document?
Options:
Question 14.
Which tab in Microsoft Word is primarily used to insert a Table of Contents?
Options:
Question 15.
Which feature in Microsoft Word allows you to quickly locate and substitute all instances of a specific word or phrase throughout your document?
Options:
Question 16.
How can you insert a pre-designed cover page into your Microsoft Word document?
Options:
Question 17.
Which of the following methods is used to center-align a paragraph in Microsoft Word?
Options:
Options:
Question 18.
Which of the following steps is the correct way to insert a footnote in Microsoft Word?
options:
Options:
Question 19.
In Microsoft Word, which of the following methods is the most direct way to apply italics to selected text?
Options:
Question 20.
How do you change the page orientation (e.g., from portrait to landscape) in a Microsoft Word document?
Options:
Question 21.
In Microsoft Word, which of the following methods is used to change the color of a selected text?
Options:
Question 22.
In Microsoft Word, which of the following methods is used to manually force text to begin in the next column of a multi-column document?
Options:
Question 23.
Which of the following is the primary benefit of using Styles in Microsoft Word?
options:
Options:
Question 24.
What is the correct procedure to save a Microsoft Word document as a PDF file?
Options:
Question 25.
Which of the following steps allows you to insert a symbol such as © or ™ into your Word document?
Options:
Which Microsoft Word skills should you evaluate during the interview phase?
Assessing every aspect of a candidate's Microsoft Word skills in a single interview is challenging. However, focusing on core skills will help you determine if they are the right fit. These are some key Microsoft Word skills to evaluate during the interview process.
Formatting Skills
Evaluating formatting skills can be streamlined with targeted assessments. An Excel assessment can help you filter candidates based on their proficiency in formatting and other document creation skills. Save time and effort by identifying top performers early.
To evaluate formatting skills, try asking a question that requires the candidate to think on their feet. This helps to gauge their real-world problem-solving abilities with Microsoft Word.
Describe a time when you had to reformat a complex document under a tight deadline. What steps did you take to ensure accuracy and speed?
Listen for responses that showcase a systematic approach, use of styles, and shortcuts. The candidate should demonstrate an understanding of how to prioritize tasks and maintain quality under pressure. Spot those who have had prior experience with document editing.
Mail Merge
Wondering if your candidate has practical mail merge experience? An assessment test could be your answer. Consider using an Excel Workbook test to evaluate their ability to manipulate data, a pre-requisite for mail merge.
A targeted interview question can provide insights into a candidate's mail merge experience. It can also reveal their problem-solving approach in practical scenarios.
Explain the steps involved in performing a mail merge using a spreadsheet. What are some common issues you've encountered, and how did you resolve them?
Look for a clear explanation of the mail merge process, from selecting the data source to personalizing the document. The candidate should mention data validation, troubleshooting common errors, and ensuring data privacy.
Document Security
You can evaluate document security knowledge with a targeted assessment. While we don't have a dedicated test, skills in attention to detail is very useful. After all, protecting documents is all about not missing anything.
A scenario-based question can assess a candidate's understanding of document security principles. It can also test their ability to apply these principles in real-world situations.
Describe the steps you would take to secure a sensitive document containing confidential client data before sharing it via email. What security features would you use and why?
The ideal response includes password protection, restricted editing, and possibly digital signatures. The candidate should justify their choices based on the sensitivity of the data and potential risks of unauthorized access.
Hire Top Microsoft Word Experts with Skills Tests
When hiring for roles that require Microsoft Word proficiency, it's important to accurately assess candidates' skills. Ensure they possess the necessary abilities to perform their job effectively.
Skills tests are the most effective way to evaluate a candidate's Microsoft Word abilities. Consider using Adaface's IT Tests to gauge their expertise.
After using skills tests, you can confidently shortlist the top candidates. These shortlisted individuals can then be invited for interviews to further assess their suitability.
Ready to find your next Microsoft Word expert? Sign up with Adaface to get started.
English Comprehension Test
35 mins | 18 MCQs
The English Comprehension test evaluates a candidate’s ability to comprehend business-level English, understand textual information, deduce information from presented facts and express ideas clearly in English. This test is used by recruiters for pre-employment screening of candidates for roles that require a good command over the English language.
Try English Comprehension Test
Download Microsoft Word interview questions template in multiple formats
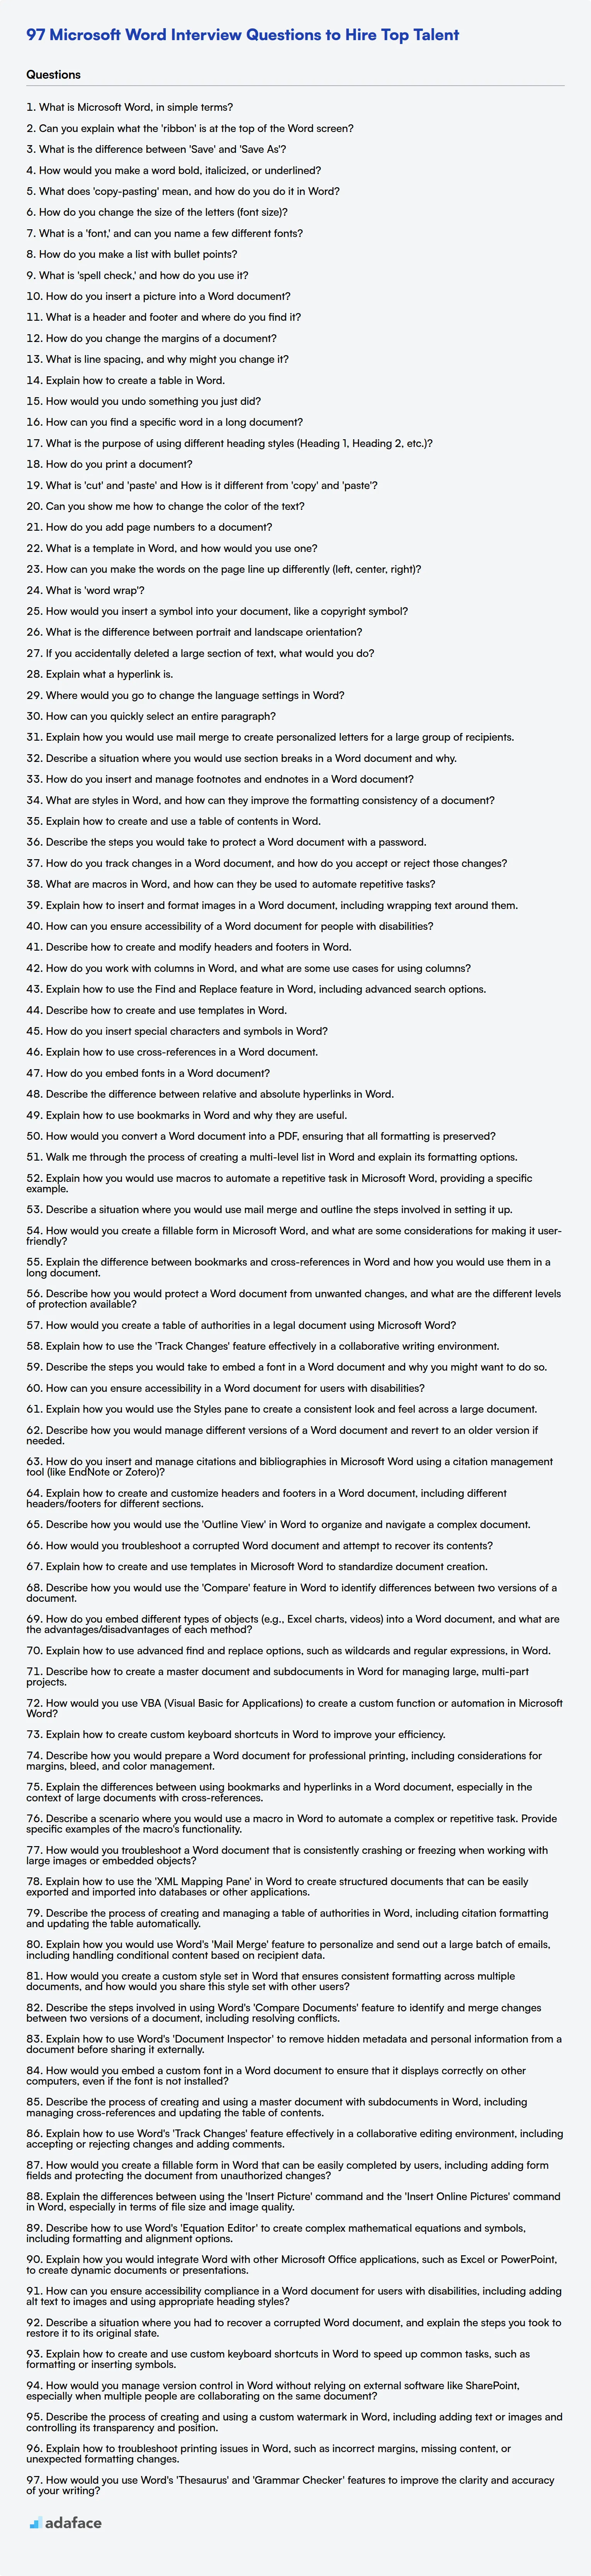
Microsoft Word Interview Questions FAQs
What are some basic Microsoft Word interview questions?
Basic questions often cover topics like formatting text, creating tables, and using templates.
What are some intermediate Microsoft Word interview questions?
Intermediate questions might explore mail merge, working with styles, and managing document sections.
What are some advanced Microsoft Word interview questions?
Advanced questions often cover topics like macros, custom templates, and advanced formatting techniques.
What are some expert Microsoft Word interview questions?
Expert-level questions could delve into complex automation tasks, troubleshooting, and integrating Word with other applications.
Why use skills tests for Microsoft Word expertise?
Skills tests offer a standardized way to assess a candidate's practical knowledge and proficiency in Microsoft Word, ensuring they possess the required skills.
40 min skill tests.
No trick questions.
Accurate shortlisting.
We make it easy for you to find the best candidates in your pipeline with a 40 min skills test.
Try for freeRelated posts
Free resources

Join 1200+ companies in 80+ countries.
Try the most candidate friendly skills assessment tool today.

40 min tests.
No trick questions.
Accurate shortlisting.
No trick questions.
Accurate shortlisting.